Hibernate List and Set Mapping with code samples
In my earlier article, I gave an introduction to Hibernate Collection mapping. In this article, I will be covering how you can use this feature to map a List or Set to a database table.
When to use Collection Mapping
Sometimes, your entity may have a field which is a Collection of primitive types. You may want to store these values in the database. In such a case, you cannot use a OneToMany association since the target Collection has primitive values. The Collection Mapping feature is useful in such scenarios.
@ElementCollection annotation
Just to recap my earlier article, Hibernate/JPA supports the @ElementCollection annotation. You need to specify this annotation on the Collection that you want to persist to the database.
Consider the following Studentclass:
@Entitypublic class Student { @Id @GeneratedValue(strategy=GenerationType.IDENTITY) private int id; private String name; @ElementCollection private List<Integer> marks; //getters and setters}- The Student class has fields corresponding to id and name.
- It also has a marks field that corresponds to the marks of that Student.
- The marks field is a List of Integer values. It can also be of type Set
- The @ElementCollection annotation is specified on the marks field.
Saving an Entity with a Collection
Once the field in the entity is marked with the @ElementCollectionannotation, you simply need to invoke the savemethod on the entity. This will cause a separate table to be created corresponding to the values in the Collection. The following code demonstrates this:
public class Main { public static void main(String args[]) { SessionFactory sessionFactory = HibernateUtil.getSessionFactory(); Session session = sessionFactory.openSession(); Transaction tx = session.beginTransaction(); Student student = new Student("Deepa"); List<Integer> marks = Arrays.asList(87,91); student.setMarks(marks); session.save(student); tx.commit(); session.close(); HibernateUtil.closeSessionFactory(); }}- This code creates a Student object.
- It also creates an Integer List corresponding to marks and sets them in the Student object.
- Finally, it invokes session.save on the Student object.
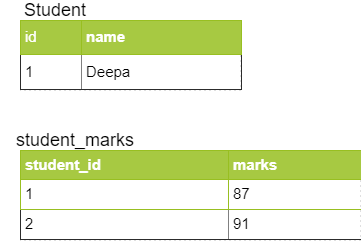
When you execute this code, it creates tables as follows:
CollectionTable
You can customize the name of the table storing the Collection via the @CollectionTable annotation. You can also customize the name of the id column. The following code demonstrates this:
@Entitypublic class Student { @Id @GeneratedValue(strategy=GenerationType.IDENTITY) @Column(name="id") private int id; private String name; @ElementCollection @CollectionTable(name = "MARKS_PER_STUDENT", joinColumns = @JoinColumn(name = "S_ID")) private List<Integer> marks;}- In addition to @ElementCollection, the code also specifies the @CollectionTable annotation on the marks field
- It specifies the name attribute with the value “MARKS_PER_STUDENT“. So the name of the table having the Collection values will be MARKS_PER_STUDENT
- It specifies the @JoinColumn attribute with the value “S_ID“. So the name of the id column in the Collection Table will be S_ID
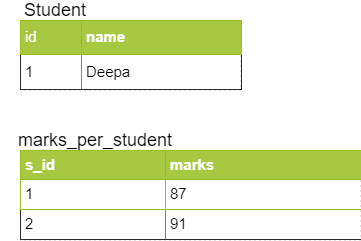
So when you save a Student object, this code creates the following table:
Further Learning
Master JPA and Hibernate with Spring Boot
Spring Data JPA with Hibernate
Hibernate and JPA Fundamentals
Conclusion
So in conclusion, Hibernate/JPA supports the @ElementCollection annotation. You can use it to map a Collection to a database without having to use the @OneToMany annotation and creating a separate entity. In this article, we saw how you can use the @ElementCollection annotation to map a List of primitive values to a database table. In subsequent articles, I will be demonstrating how you can use @ElementCollection annotation to map a Collection of non-primitive types.


Comments
Post a Comment